Breadboard Synth
In late 2023 I had a reasonable understanding of the basic circuits for a handful of synth modules but still had too many questions to confidently start building anything, and by sheer luck Look Mum No Computer uploaded this video building an entire synthesizer voice from scratch on breadboards. I followed along.
Step one was getting the oscillator working on a breadboard. I used a AS3340 oscillator on-a-chip, which is a clone of the legendary CEM3340. All I was trying to do was add the supporting components according to the AS3340 manual and connect it to power, but still it took several weekends to make it work. The problems were components not making good contact with the breadboard, and the AS3340 chip being faulty, probably because I broke it without realizing. Fortunately I had spares.
Eventually my oscilloscope confirmed that my oscillator was working:
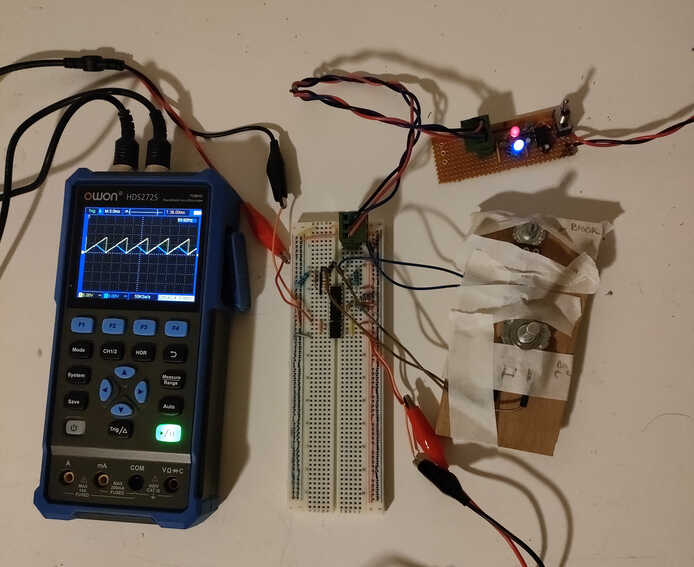
In the image above, the oscillator is implemented on the breadboard. There are a pair of knobs on the right that control the pitch of the oscillator - one is for coarse control and the other for fine control. The fine pitch control would usually be done with a smaller trim pot but I didn’t have any at the time. Turning either knob would change the frequency of the signal plotted by the oscilloscope.
The circuit-board at the top right with the red and blue LEDs is the power supply. Almost every synthesizer circuit I came across requires a positive and negative DC power input (as well as ground). Information on how to make a negative voltage was a bit hard to find. The first technique I learnt about is called a charge pump, which produces an output DC voltage out of a possibly different input DC voltage using a timer (like a 555 timer) to repeatedly charge and discharge a capacitor. The output voltage can be negative.
The power supply plugs into a 12v DC wall wart. It forwards the +12v and ground inputs directly to its output, and uses a charge pump to create the additional -12v output. This worked fine for oscillator as it didn’t draw a lot of current, however as the synth got more complicated and power hungry my little power supply couldn’t keep up.
Eventually I found a much simpler technique for making a negative voltage where you take an AC input (not straight from mains! - the one here uses a 12v AC wall wart) and separate it into its positive and negative components. The positive and negative components of the input are used to charge some (big!) capacitors that discharge through the power supply’s output. I first learnt about this approach here. I built a new power supply which had no trouble powering the entire breadboard synth and I’ve used the same technique in all my later analog synths.
Here’s my second power supply. Look at those capacitors! I was a bit nervous the first time I turned it on…
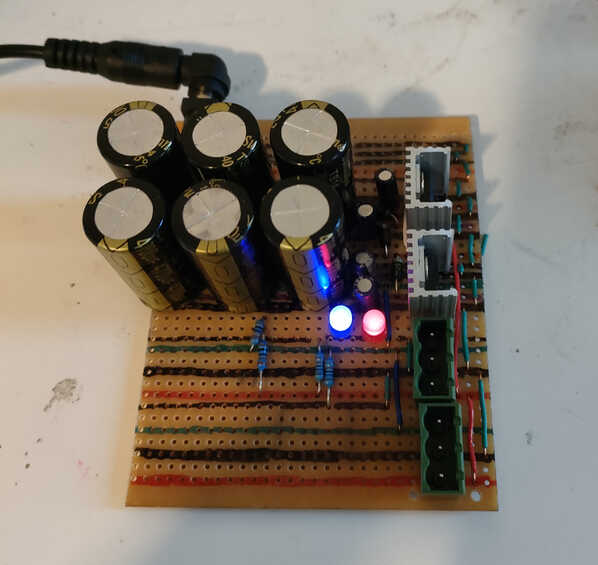
The red and blue LEDs indicate that the positive and negative voltage outputs are working. In addition to being pretty they’re a safety feature. If either LED is off while the device is powered on it suggests one of the synth modules has shorted out so you can quickly turn off the power and investigate. Also these big capacitors can store a lot of energy, and they continue to store it long after the power has been turned off, so it’s possible to get shocked while working on the power supply even if it’s not plugged in. The LEDs are a constant small load on the power supply which lets the capacitors discharge over several seconds after turning off the device, and you can use the fact that the LEDs are off to tell that it’s safe to lick I mean touch.
And here’s the full breadboard synthesizer:
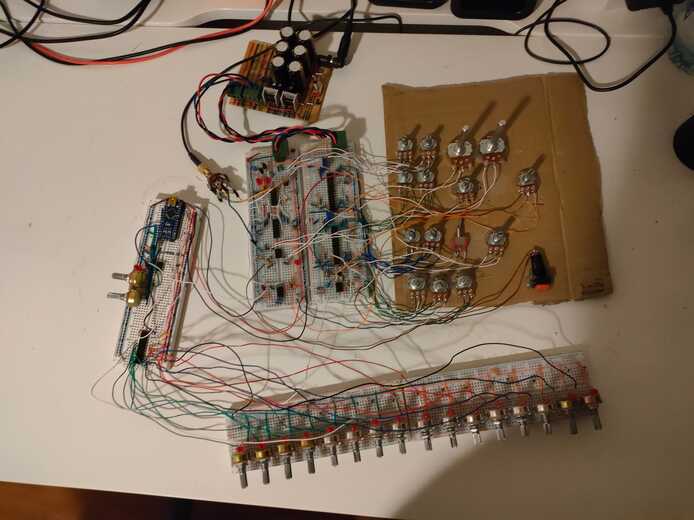
The two breadboards in the centre contain the synth voice like the one from the LMNC video. There’s a pair of oscillators that can modulate each other’s pitch, a low-pass filter, and an envelope generator. The additional breadboards are a 16-step sequencer. An Arduino controls the timing and note duration and uses a decoder to select one of the 16 knobs at a time from the bottom two breadboards. The position of each of those 16 knobs determines the pitch of one of the 16 notes in the sequence.
Too see the breadboard synth in action at various stages of completion, check out this youtube playlist.